


developer_mh
-
Posts
1,860 -
Joined
-
Last visited
-
Days Won
173
Everything posted by developer_mh
-
Hi Yaroslav, of course you can! You'll need module mounting systems for this which allow for any orientation you could think of. Perhaps this short video might answer your question already: If not, please let me know. Kind regards, Martin
-
Hallo Michi, interessante Frage! Hochgelegene Standorte realistisch nachzubilden, ist wegen der speziellen klimatischen Bedingungen tatsächlich sehr komplex. Gerade das Mikroklima hat einen sehr starken Einfluss in den Bergen und kann bewirken, dass zwei nur wenige hundert Meter voneinander entfernte Standorte völlig unterschiedliche Einstrahlungswerte übers Jahr aufweisen (zB eine exponierte Lage nahe dem Gipel im Vergleich zu einer schattigen, niedrigeren Lage auf der Wetterseite). Daher sind in solchen Fällen Messdaten vom späteren Standort Gold wert. Da man diese in der Regel jedoch nicht hat, wirst du dich mit einer Abschätzung über den nächstgelegenen Standort begnügen müssen. In jedem Fall kannst du aber versuchen, zumindest über die Albedo (Reflexionseigenschaften des Bodes) und die Horizontverschattung die Begebenheiten vor Ort möglichst realistisch einzugeben. Für die Albedo solltest du Werte um die 0.8 für die Monate, in denen es Schnee gibt, eingeben, sonst die standardmäßigen 0.2. Die Horizontverschattung sollte auch möglichst genau ermittelt und dann bei den Modulfächen unter Verschattung als Azimut/Elevations-Datenpunkte eintragen. Ich hoffe, das hilft erstmal weiter. Wenn du weitere Fragen hast, bitte gerne immer Guten Start in die Woche, Martin
-
Hi Boris, Yes, of course this possible! Am I right that you refer to the planning in the 3D environment? If so, just select the modules you want to connect (by using the left mouse button and holding the Ctrl key), right click on your selection and choose "Add to 'Define Module Areas' Dialog". Then you can go to the dialog "Define Module Areas" by clicking the third button at the top left. In the dailog you will see your selected modules with the option to connect them to an inverter. If you want to define other module areas first, e.g. for connecting two module areas to one inverter, just close the dialog, define another module area in the same way as before, and re-open the dailog. Then you'll have the two areas available to connect them. I hope I could answer your question. If not, please dont hesitate to ask. Best wishes and kind regards, Martin
-
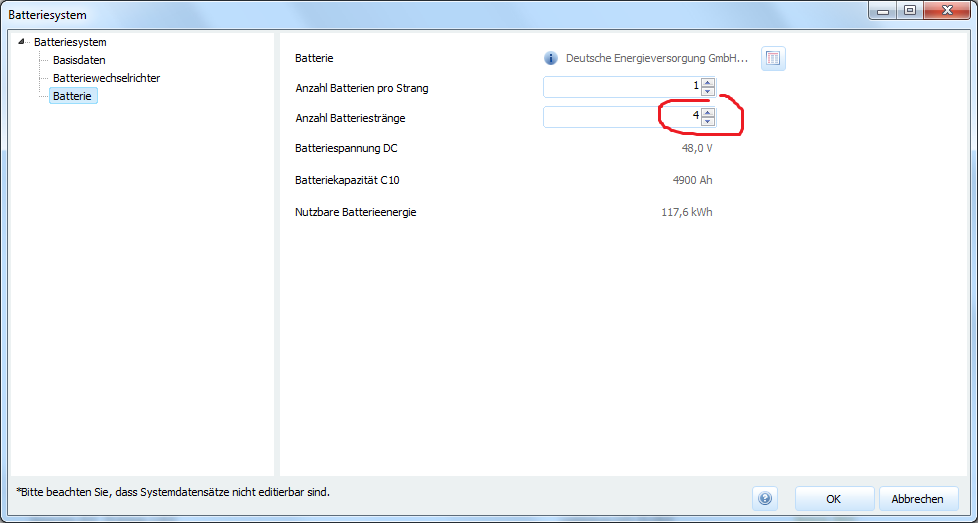
Hallo PNK, Hinweis: Bitte den letzten Post mit aktuellen Informationen beachten. eine Anzahl kann man bei den Speichersystemen leider derzeit nicht eingeben. Was Sie aber machen könnten, wäre die Anschlussleistung des Speichers sowie die Anzahl der Batterie-Stränge zu vervierfachen. Dazu kannst du einfach eine Kopie des Senec-business 30Pb anlegen und die folgenden Felder anpassen: So kann man so tun, als hätte man eine 4er Kaskade des Systems. Hilft das weiter? Beste Grüße und viel Erfolg, Martin

-
Hallo Valentin Kunkel, bitte entschuldigen Sie die späte Antwort. Könnten Sie uns vielleicht das Projekt zur Verfügung stellen? Dann könnten wir besser nachvollziehen, wie die Werte zustande kommen.Gerne auch als private Nachricht. Danke! Beste Grüße, Martin
-

first steps [Tutorial] PV*SOL premium 2017– First Steps
developer_mh posted a question in Tutorials (Read only)
[Tutorial] PV*SOL premium 2017 - First Steps -
Hi Eng.Najeva, could you explain a bit more in detail what is not working? Is there an error message that you could share? Thanks in advance, kind regards, Martin
-
Hi Daniel, edit: Please see the next post for updated information thanks for your question. You are right, at the moment we handle the MPPT functionality and the DC/AC conversion at the same time, i.e. the SolarEdge devices are represented as normal, if small, PV inverters in our simulations. Energetically the results won't be that different in the end compared to using separate devices for MPPT and DC/AC, but yes, in the circuits and plans (and in the details of the energy balance), these systems are simplified right now. For the next major version we are working on implementing a totally new approach for power electronics and polymorphic strings, where we will cover this topic as well. Then you will be able to connect each module to a power optimizer (or two modules to one power optimizer) and connect these to a common inverter. The major version is scheduled for autumn this year. Kind regards, Martin
-
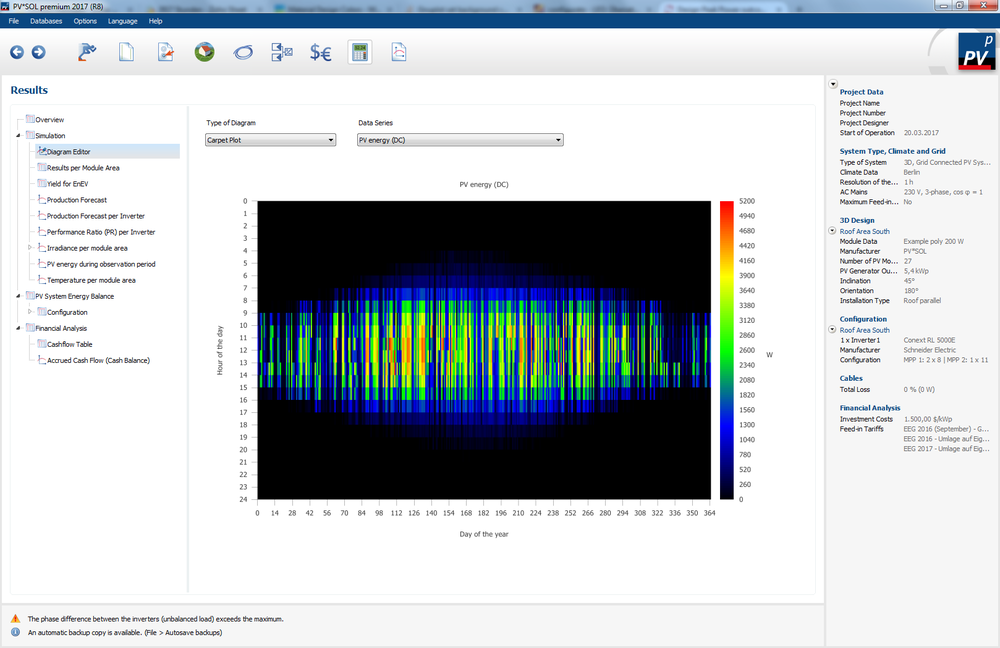
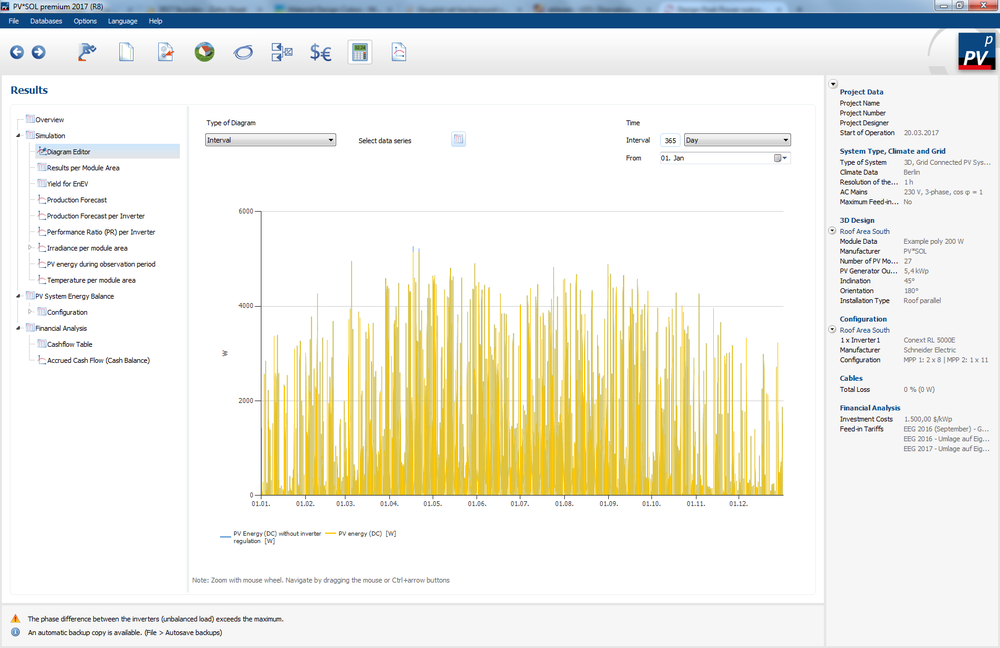
Hi Daniel, there are several ways to determine the maximum DC power of the PV system. Personally I think the fatest way is to go to the 'Diagram Editor' on the results page, select carpet plot and choose 'PV energy (DC)' data series. The maximum value can be easily read off the scale on the right. See the picture below: Alternatively, you can go to the interval mode of the diagram editor, choose the corresponding data sets and plot the whole year: When you hover over these diagrams with your mouse, you'll see the actual value in Watts. The third option would be to export the simulation results as a csv file, open it in Excel and search for the maximum over the respective columns. Hope that helps, kind regards, Martin
-
Sehr merkwürdig... hast du mal probiert, die Regionaleinstellungen von Windows zu verändern, nicht nur das Tastaturlayout? Aber eigentlich kann es daran nicht liegen, da wir ja auch andere Kunden in Belgien haben, bei denen das Problem nicht auftritt. Bin etwas ratlos, aber probieren würde ich einfach mal: Regionaleinstellungen auf Deutsch (Deutschland), PVSOL deinstallieren und wieder neu installieren nochmal in 3D prüfen Mehr fällt mir grade nicht ein. Wenn das nichts hilft, wäre es sehr hilfreich, wenn du mal einen kurzen Screencast machen könntest, der das Problem zeigt. Auch die Systeminfos wären dann interessant. Viel Erfolg, hoffentlich klappts! Martin
-
Hallo Daniel, das ist ungewöhnlich und sollte so nicht sein, mit der Testversion hat das auch nichts zu tun. Bisher ist uns auch noch nicht zu Ohren gekommen, dass andere User das Problem hatten. Passiert das ständig bei egal welchen Zahlen oder nur sporadisch, evtl bei bestimmten Zahlen, evtl. mit Komma oder Punkt? Beste Grüße, Martin
-
Es müsste per privater Nachricht gehen. Wenn Sie mit der Maus auf meinen Namen gehen (nicht klicken), erscheint eine Ansicht, in der ganz unten "Message" steht. Damit sollte es gehen.
-
Hallo sonnenblume, wäre es möglich, das Bild zu sehen, das in Photoplan geladen wurde? Sonst ist es schwer zu sagen, was genau da passiert ist. Viele Grüße, Martin
-
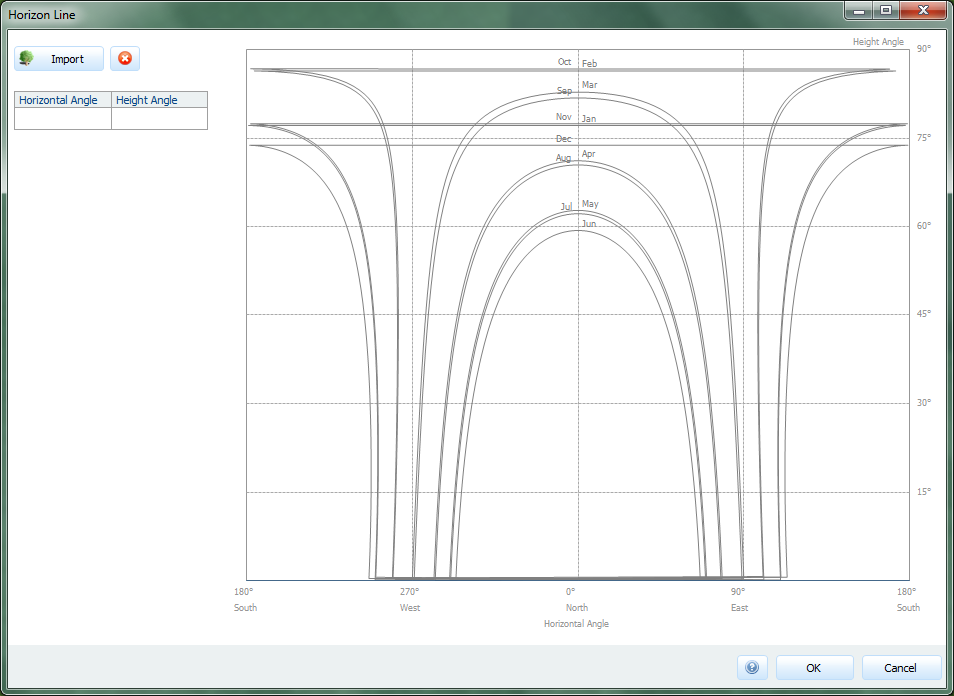
Hey, for those purposes you could have a look at the horizon editor. There you'll see the sun paths for the 21st of every month on the location you selected. Here is a screenshot for Surabaya, Indonesia: Hope that helps, Martin
-
Hi Johan, you just need to drag the object off the button 'Building'. I tried to make a short gif to demonstrate: Hope that helps, Martin
-
Hi Johan, thanks for your question! You can just drag the orphan module next to your string. In fact, you can drag it anywhere you want. When you begin dragging, a colored frame will appear that you can move over a module of another string. In your case you might want to place it above 7.1.3.14 and left to 7.1.3.1, right? When you drop it there, it will be switched with the module that was there before. Hope that helps, kind regards, Martin
-
Dear Johan, This feature was added in version 2016 R1, so I am afraid that is not possible with your version of 7.5.4. Here you can see the full log of changes and new features that were added since version 7.5.4 (a lot, really ): http://www.valentin-software.com/en/support-service/customer-service/release-notes/pvsol-premium You could download the newest version (2017 R8), test it, and perhaps you might consider upgrading - or just go for a software maintenance which automatically provides you with all the updates. Kind regards, Martin
-
Hallo! Der Vollständigkeit halber: In PV*SOL ist es seit der Version 2017 R1 (veröffentlicht im Oktober 2016) möglich, DC gekoppelte Speichersysteme zu simulieren. Dabei stehen Generator- und Zwischenkreis-Kopplungen zur Verfügung. Hier dazu mehr: https://help.valentin-software.com/pvsol/2018/berechnungsgrundlagen/batteriesysteme/ Beste Grüße, Martin
-
Hi, we now also have a short tutorial video on youtube that shows how to connect two module areas to one MPP tracker: Cheers, Martin
-
Hi, just for the sake of being up-to-date: We have P90 exceedence probability calculations in PV*SOL since version 2017 R1 (released in October 2016). More information here: https://help.valentin-software.com/pvsol/2019/pages/financial-analysis/bankability-p50p90/ Regards, Martin
-
Lastprofil Wärmepumpenanlage mit Heizung und Trinkwasser (Luft/Wasser)
developer_mh replied to danielsun's topic in PV*SOL
Hallo Daniel, danke für die Anfrage zu den Lastprofilen der Wärmepumpen. Ich habe das eben versucht nachzuvollziehen, aber bei mir bekommen ich auch im csv-Export die zu erwartenden 3441 kWh heraus. Vielleicht prüfst du nochmal die folgenden Punkte Bist du beim Bilden der Summe im csv-Export vielleicht in der Spalte verrutscht? Stehen vorne auf der Seite "Verbraucher" auch wirklich die 3441 kWh als jährlicher Gesamtverbrauch? Ich hoffe, das hilft weiter. Wenn nicht, immer gerne fragen Beste Grüße und einen guten Wochenstart, Martin ps: ich verschiede den Eintrag mal ins deutsche Forum, ok? -
[Tutorial] PV*SOL premium 2017– Mounting system on a facade
developer_mh posted a question in Tutorials (Read only)
[Tutorial] PV*SOL premium 2017– Mounting system on a facade How to create a mounting system on a facade: In the 3D environment, go to the page "Module Mounting" Move to the facade before defining the assembly system Click the button "New Assembly System" Select "Facade Tilt" For a module inclination of 30°, the assembly system must have a mount angle of 60° to the facade A 75° mount angle results in an inclination of 15° to the horizontal plane Press the enter key to confirm or click "OK" Click the button "Fill Area" Now click and hold the left mouse button to create a module row in the defined area Thanks for watching! -
[Tutorial] PV*SOL premium 2017– Aufständerung an einer Fassade So erstellen Sie eine Aufständerung an einer Fassade Gehen Sie auf die Seite "Modulaufständerung" Wechseln Sie vor der Definition des Montagesystems auf die Fassade Klicken Sie den Button "Neues Montagesystem" Wählen Sie "Fassadenaufständerung" Für eine Modulneigung von 30° muss das Montagesystem einen Aufständerungswinkel von 60° zur Fassade haben 75° Aufständerungswinkel ergibt eine Neigung von 15° zur Horizontalen Bestätigen Sie mit der Eingabetaste oder klicken Sie "OK" Klicken Sie den Button "Aufziehen" Klicken Sie nun links und halten Sie die Maustaste gedrückt, um im definierten Bereich eine Modulreihe zu erzeugen Vielen Dank fürs Zuschauen!
-
[Tutorial] PVSOL premium 2017 - Configure two dormers to one string How to configure two dormers (module areas) to one string In the 3D environment, go to the page "Module configuration" Click on the button with the hand symbol to open the window "Define Module Areas" Now click on the import button to import all module arrays Combine the groups by clicking the button "Combine Selection". Make sure that the groups are checked Click the "Configure" button Use the "Suggest Configuration" feature to select a suitable inverter Now both dormers are combined in a single string Thanks for watching!
-
Hi Allan, I'm afraid this is not possible at the moment, but we will put it on our todo list. Kind regards, Martin


