hotline_oh
-
Posts
646 -
Joined
-
Last visited
-
Days Won
39
Everything posted by hotline_oh
-
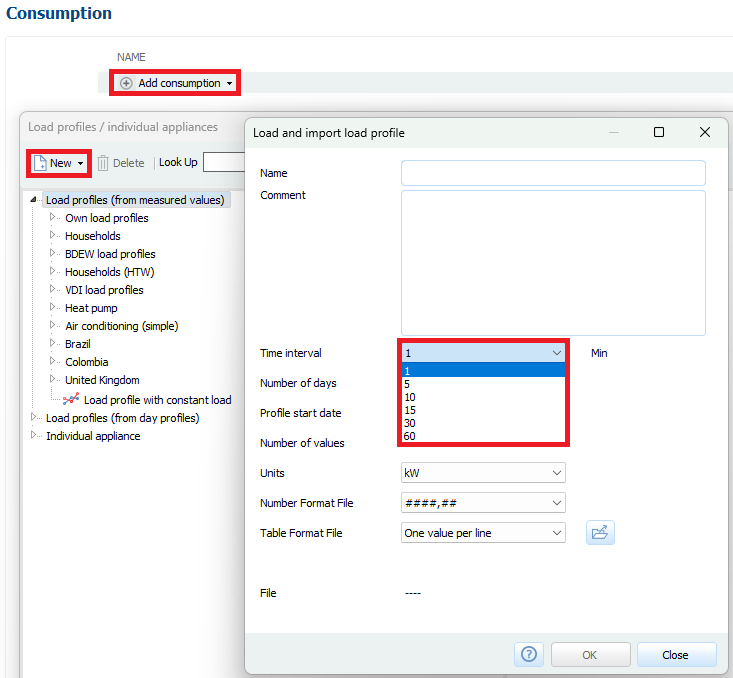
Dear Haydn, Thank you for your inquiry. If you select multiple load profiles (whether imported by you or built into the program), they are aggregated into a total consumption figure for the simulation. In the hourly simulation, the self-consumption share is calculated for every hour of the year by determining what percentage of consumption can be covered by PV energy. Hourly simulation is the standard. However, when importing load profiles, you can also import data with 1-, 5-, 10-, 15-, or 30-minute intervals and then run the simulation on a minute-by-minute basis to obtain more precise results.
-
Hallo, vielen Dank für Ihre Anfrage. Wir haben soeben die Hilfe zur Rexplorer API veröffentlicht. Um sich registrieren zu können, müssen Sie eingeloggt sein. (Ein Test innerhalb der Testversion ist nicht möglich.) Die ersten 10 Standorte sind kostenlos. Danach können Sie in den bezahlten Tarif wechseln (dann unbegrenzter Zugriff). Für jede Standort-Anfrage erhalten Sie alle Gebäude in einem Umkreis von 100 m. Die Rexplorer API ist nicht mit der Google Solar API kombinierbar. Auf der Intersolar in München vom 23. bis 25. Juni 2026 werden wir die Planung mit der Rexplorer API live zeigen. Sie finden uns am Stand A4.331.
-

PV*SOL for retrofit string redesign of existing rooftop PV system
hotline_oh replied to MONA's topic in PV*SOL
Hello, Thank you for your inquiry. PV*SOL is generally suitable for retrofit string redesign of existing rooftop PV systems, subject to the following limitations: The 3D visualization allows a maximum of up to 7,500 elevated modules or up to 10,000 roof-mounted modules. You can only simulate the entire system, comprising 13,000 modules, in the 2D planning tool. For 3D planning (including shading analysis), we recommend that you split your overall project into two or three sub-projects. There is also an area limitation. When planning with the Google Solar API or with a map section from another provider, you are limited to a size of 200 m x 200 m. If your overall system is larger, you will need to simulate sub-systems. When carrying out 3D planning, please follow our guidelines on dividing large systems into subsystems so that you can make changes at a later stage or create different retrofitting options. Save different retrofitting versions in separate project files. By selecting ‘File’ --> ‘Project Comparison’, you can compare the simulation results of up to 6 project versions.- 1 reply
-
- 1
-

-
Hello, Thank you for your message. We have forwarded your suggestion to our development team and thank you for bringing this to our attention.
-
Dear Alberto Perez, Thank you for your inquiry. If you are missing datasets, the best approach is to email hotline@valentin-software.com with the exact model designation or the datasheet. We will then contact the manufacturer and request that the missing products be added. You can create datasets yourself, subject to the following limitations: Data on low-light performance is usually unavailable for PV modules. You can either select the "Standard low-light performance" option or copy the low-light performance data from a similar module. Efficiency curves are usually unavailable for inverters, so you must copy the efficiency curve from a similar inverter. For battery systems, ensure that the lower value is always used when there are differing charge/discharge power ratings for the inverter and the storage unit. Custom datasets can be imported; supported formats are PAN for PV modules and OND for inverters.
-
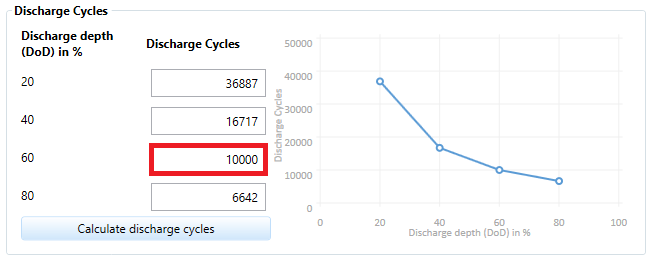
Dear Mark, Thank you for your inquiry. Since you cannot enter 8,000 cycles at 70% EOL (DoD), enter 10,000 cycles at 60% EOL (DoD) (and have the remaining values calculated).
-
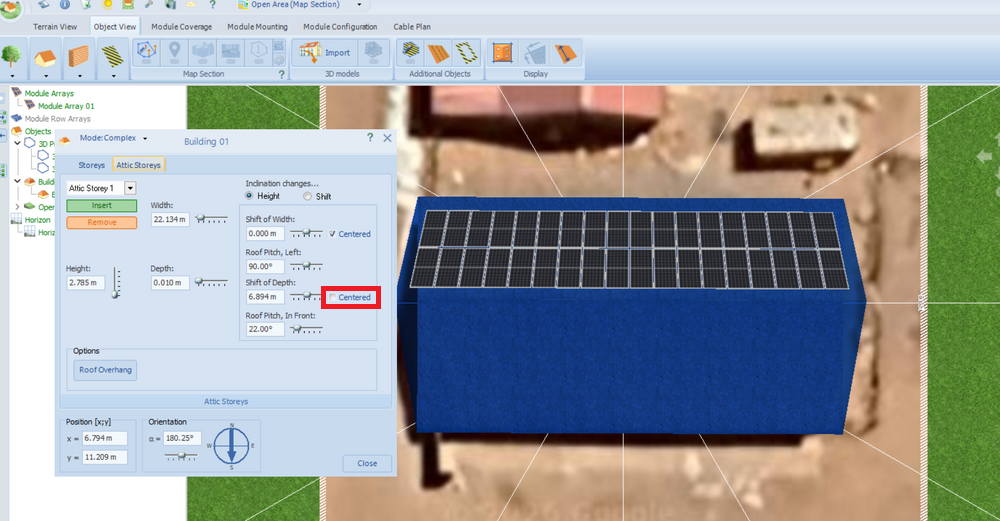
Dear Mark, Thank you for your inquiry. Your ridge is not centered. Consequently, the roof pitch is 22 degrees on the south side and 25 (or 27) degrees on the north side. If you have a symmetrical roof, check the box for "centered." If you change the roof pitch, the existing configuration will unfortunately be deleted.
-
Dear Mark, Thank you for your inquiry. Unfortunately, that is not possible. Your only option is to run the simulation twice—once with and once without the non-essential loads.
-
Dear Mark, Thank you for sharing the project file. Consumption does not take place only between 12 noon and 4 pm, but between 7 am and 7 pm. On a sunny day in November, a month with high levels of solar radiation, demand can only be met by solar power (including the battery) between 8 am and 6 pm. Electricity must be drawn from the grid for one hour in the morning and one hour in the evening. The battery is charged within an hour (8–9 am) and discharged within an hour (5–6 pm). With a usable capacity of 4.6 kWh, it is far too small to cover evening and morning consumption (before sunrise). The battery capacity would need to be increased approximately tenfold to ensure a high degree of supply security even in June, a month with low solar radiation. Excluding non-essential loads, the small 4.6 kWh battery is, of course, sufficient to cover essential loads. We have sent you the screenshots from the diagram editor by email.
-
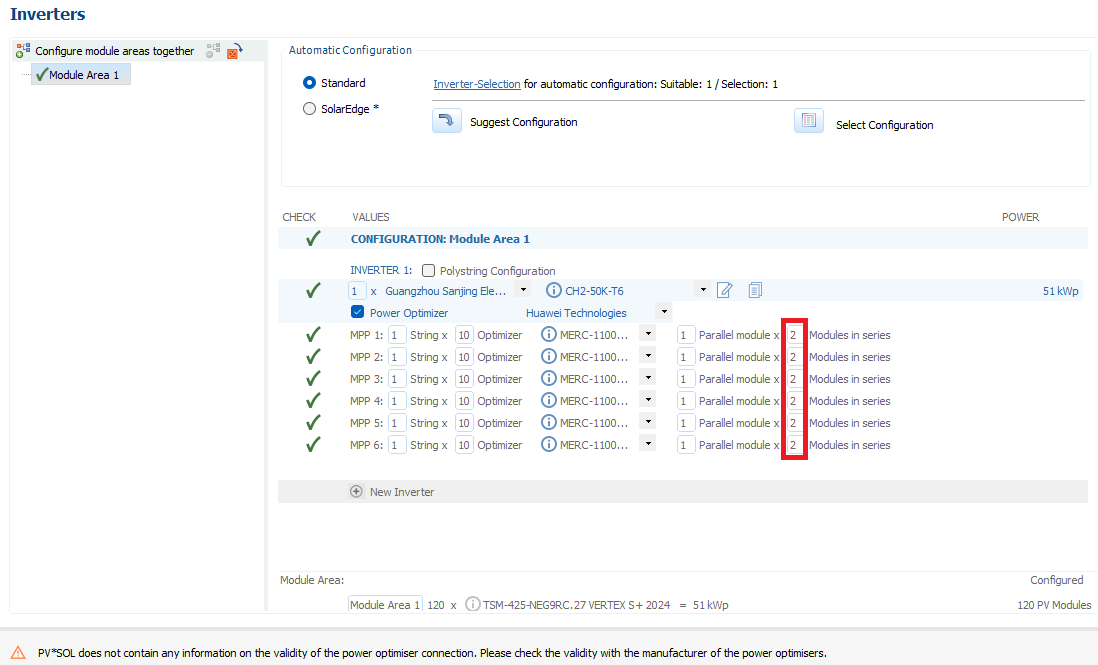
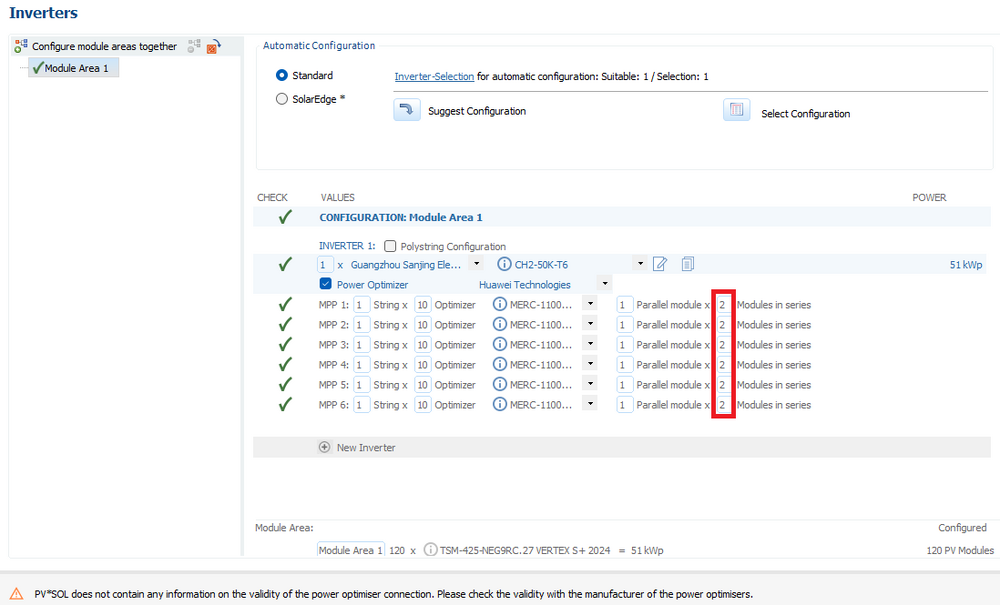
Dear pero159, Thank you for your inquiry. In the inverter configuration window, specify that you want to connect two modules in series each.
-
Can files from PVSOL Premium be opened with PVSOL Standard?
hotline_oh replied to Hannah's topic in PV*SOL
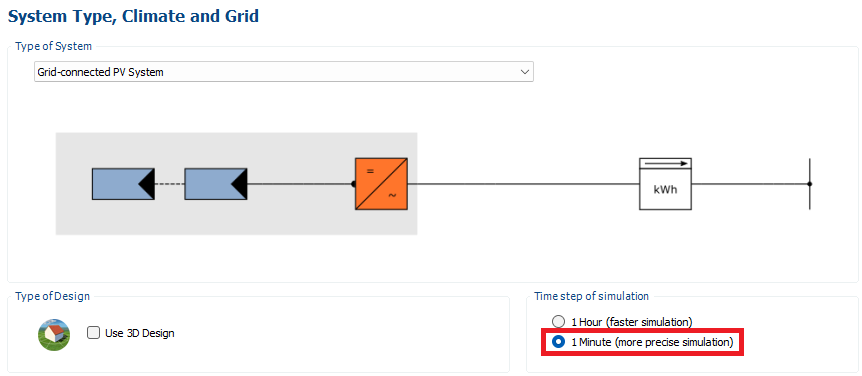
Dear Hannah, Thank you for your inquiry. PV*SOL premium files can only be opened in PV*SOL (Standard) if they are purely 2D designs, i.e. if the “Use 3D Design” box has not been ticked on the “System Type, Climate and Grid” page: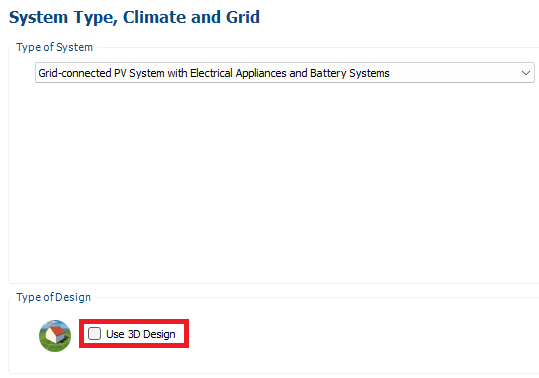
-
Dear Mark, Thank you for your message. We confirm that you have correctly configured the battery system. For LFP batteries, please define the charging strategy as follows: The values within the green box are not relevant in this case (for LFP batteries) and will not be taken into account. However, in the red box, the DOD (Depth of Discharge) is defined in percentage terms. If the system allows for a full 100% DOD, leave this value at 0%; otherwise, enter the difference here (100 – DOD in %)—for example, for a 90% DOD, please enter 10% here. The usable capacity is calculated based on this value.
-
Dear Mark, Thank you for your inquiry. You can watch our webinar recording. The financial analysis is explained starting at 01:00. Further information can be found in our online help section.
-
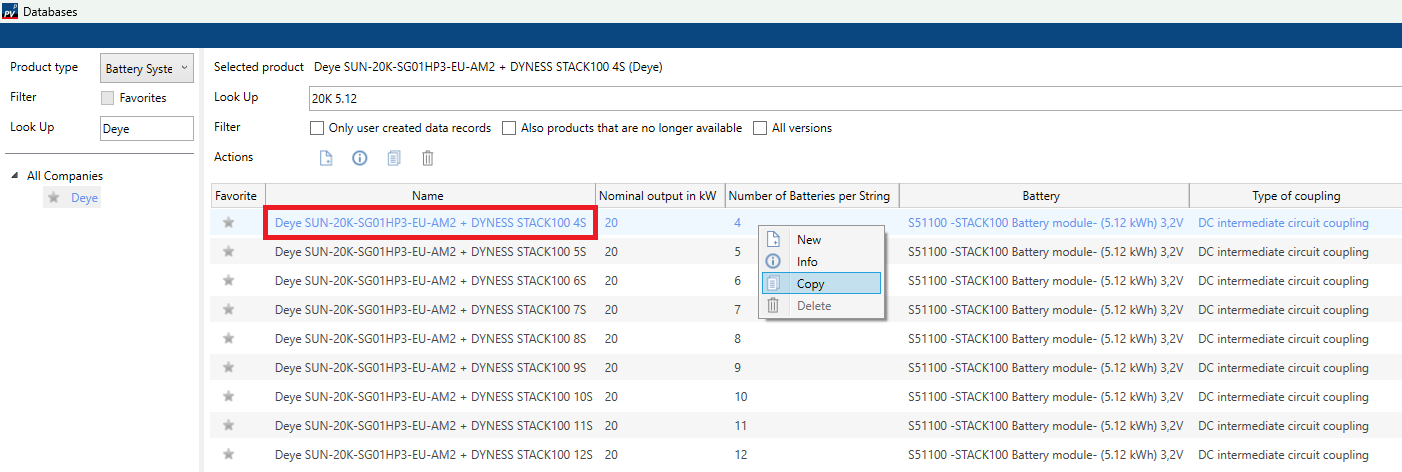
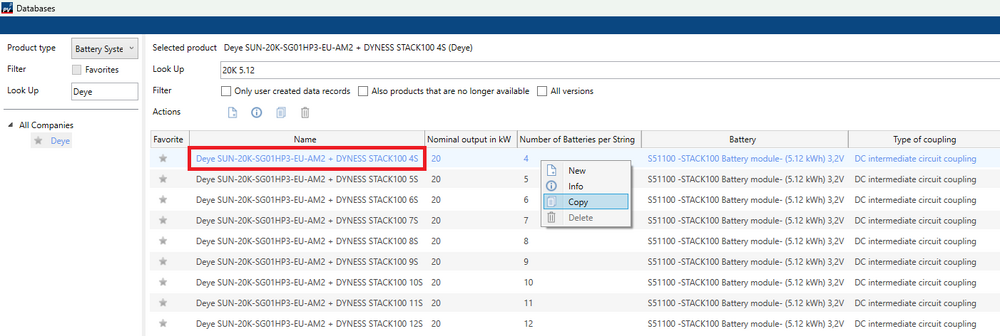
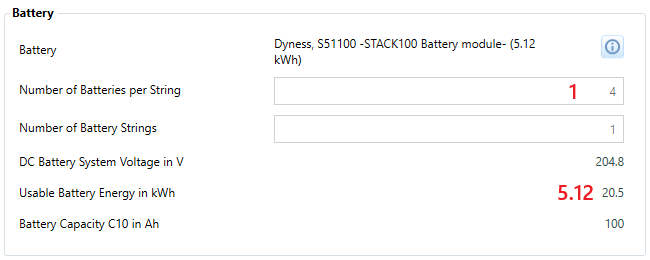
Dear Mark, Thank you for your inquiry. We confirm that you have selected the correct system type (Grid-connected PV System with Electrical Appliances and Battery System) and the correct battery system (featuring DC intermediate circuit coupling, in accordance with the circuit diagram). Although your preferred battery system (Deye 20K inverter with 5.12 kWh battery) is not currently available in our database, the Deye 20K inverter with 20.5 kWh battery system is available. You can copy this battery system and reduce the number of batteries per string from 4 to 1.
-
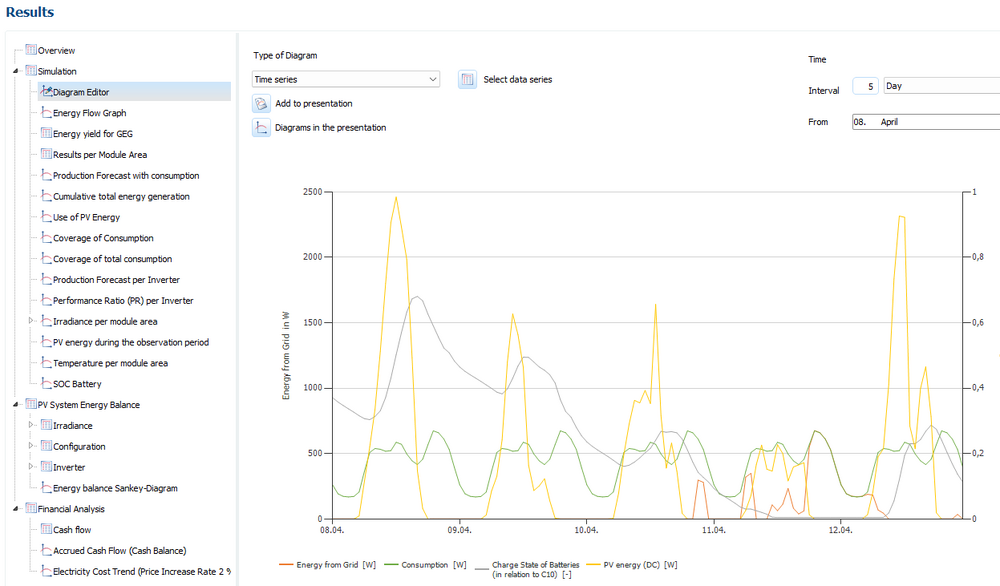
Dear Mark, Thank you for your inquiry. Roughly speaking, daily consumption amounts to 100 kWh. The PV system generates 43,247 kWh per year. Assuming an even distribution of solar radiation throughout the year, this would correspond to a daily production of 118 kWh. However, since the distribution varies significantly by season, it can be assumed that less than 100 kWh will be produced during the winter months. The energy storage system compensates only for daily (not seasonal) fluctuations; therefore, it is likely that energy will be drawn from the grid during the winter months. You can use the Diagram Editor to view the specific times at which energy is drawn from the grid (red line). If you wish, please feel free to send us the project file (*.pvprj) at hotline@valentin-software.com, and we will take a look at it.
-
Dear Umresh, Thank you for your inquiry. Net Metering As with the surplus feed-in, the electrical energy generated is primarily used for self-sufficiency. The unused electricity is fed into the power grid via a double-tariff meter and offset against the electricity purchased. The tariff counter rotates backwards. If more solar power is generated than consumed in the billing period, the surplus can be carried forward as a balance to the next billing period. Enter a price for directly marketed electricity (Price of Electricity sold to Third Party) Use the button to select a Net-Metering tariff from the database The selected tariff is valid as standard from the date of commissioning of the PV system For further information see Net-Metering Tariffs Choose a price change factor (Inflation Rate for Energy Price) You can find more information in our Online Help.
-
Hello, Thank you for your message. You can try this—for example, using the "Time-Controlled Charging/Discharging" function. However, the software is not optimized for this specific use case.
-
Hello, Thank you for your inquiry. Dynamic electricity tariffs cannot currently be taken into account. PV*SOL is planning software designed for simulating PV systems in combination with battery systems. Its energy management system is optimized for maximizing self-consumption.
-
Guten Tag, vielen Dank für deine Anfrage. Bei der Berücksichtigung von Negativstunden erhöhe bitte die Nutzungsdauer deiner Investitionen in der Wirtschaftlichkeitsbetrachtung auf 28 Jahre. Der voreingestellte Wert sind 21 Jahre, weshalb im 22. Jahr erneute Investitionen fällig werden. Zur Frage, warum sich der Vergütungszeitraum auf 27 Jahre erhöht: 576 Negativstunden p.a. entsprechen 2.304 Volllastviertelstunden p.a. (Multiplikation mit 4) bzw. 1.152 Vollastviertelstunden p.a. gemäß § 51a Abs. 2 EEG (Multiplikation mit 0,5) bzw. 23.040 Volllastviertelstunden in 20 Jahren (Multiplikation mit 20). 3.800 Volllastviertelstunden entsprechen einem Kompensationszeitraum von 1 Jahr. Der Kompensationszeitraum umfasst nun 6 volle Jahre (6 x 3.800 Volllastviertelstunden = 22.800 Volllastviertelstunden) plus 240 Volllastviertelstunden (23.040 - 22.800) im 7. Jahr. Im 7. Jahr werden noch die ersten beiden Monate vergütet (87 + 189 > 240), da die Monate des Jahres jeweils der folgenden Anzahl an Volllastviertelstunden entsprechen: 1. 87 für den Monat Januar, 2. 189 für den Monat Februar, 3. 340 für den Monat März, 4. 442 für den Monat April, 5. 490 für den Monat Mai, 6. 508 für den Monat Juni, 7. 498 für den Monat Juli, 8. 453 für den Monat August, 9. 371 für den Monat September, 10. 231 für den Monat Oktober, 11. 118 für den Monat November und 12. 73 für den Monat Dezember. Link zum § 51a EEG: https://www.gesetze-im-internet.de/eeg_2014/__51a.html

-
Hallo Jonah, vielen Dank für deine Anfrage. Wir haben dir eine Nachricht mit dem Download-Link zugeschickt.
-
Hello, Thank you for your inquiry. Unfortunately, the net-billing concept currently in effect in Croatia cannot be modeled in PV*SOL. As far as we are aware, billing is conducted on a monthly basis. You can create multiple tariffs, but the minimum payment period per tariff is one year. Our development department has been informed that, as of 2026, a minimum payment period of one month is required for Croatia. If possible, please send us the source of the diagram.
-
Guten Tag, vielen Dank für Ihre Anfrage. Der Hersteller hat die neuen Produkte in unsere Datenbank eingetragen und sie stehen Ihnen mit dem Datenbank-Update vom 15. Mai zur Verfügung.
-
Keine Anzeige der Abregelung obwohl negative Strompreise angegeben sind
hotline_oh replied to NWRIW's topic in PV*SOL
Guten Tag, vielen Dank für deine Anfrage. In den Zeiten mit negativen Strompreisen wird nicht abgeregelt. Es wird weiter eingespeist, nur eben nicht vergütet. Laut Solarspitzengesetz gibt es dafür dann einen Kompensationszeitraum, für den im Anschluss an die 20 Jahre die Einspeisevergütung noch weitergezahlt wird. Das wird in der Software automatisch berücksichtigt und in den Ergebnissen ausgegeben. Weitere Informationen dazu findest du in unseren FAQ. -
Wie erstelle ich ein Gebäude mit Zwei unterschiedlich hohen Dächern?
hotline_oh replied to Rio55's topic in PV*SOL
Hallo, vielen Dank für deine Anfrage. Ein solches Gebäude setzt du aus zwei Pultdächern zusammen: Zum gemeinsamen Verschalten wählst du im Reiter "Modulverschaltung" den Button "Alle unverschalteten Module verschalten" und im Fenster für die Wechselrichterverschaltung wählst du "Modulflächen gemeinsam verschalten", wie in unseren FAQ beschrieben.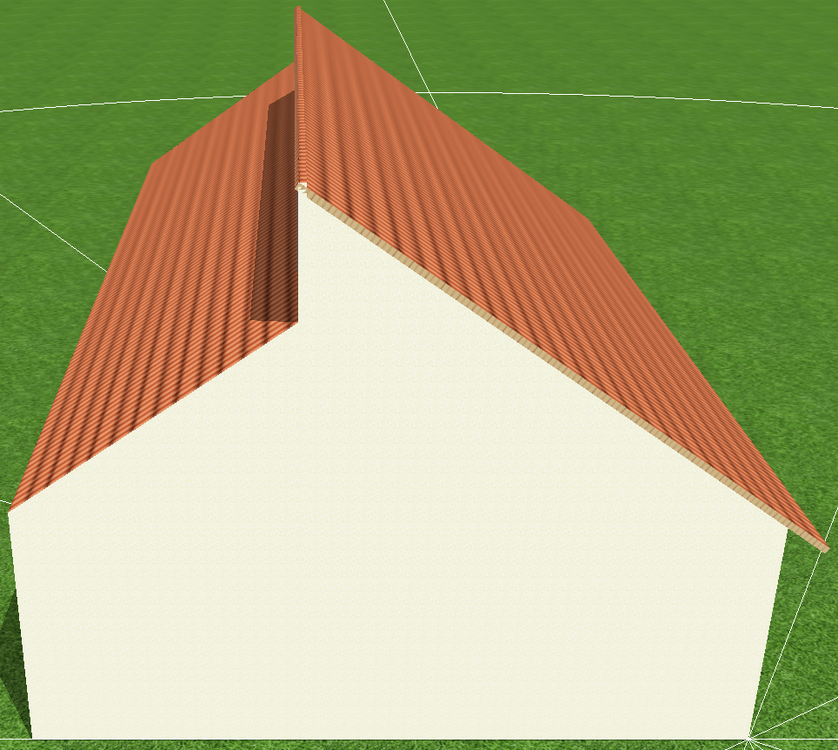
-
SUN-8K-SG04LP3-EU Daten in der Datenbank evtl. falsch
hotline_oh replied to Sven Weber's topic in PV*SOL
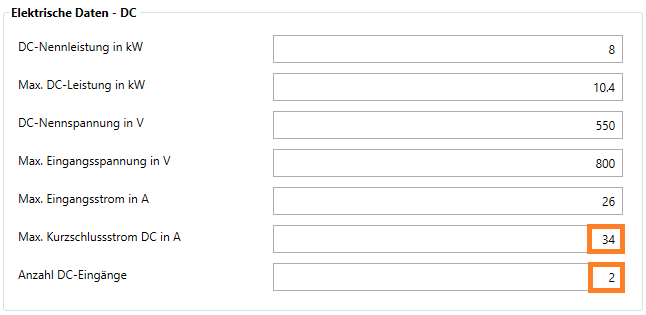
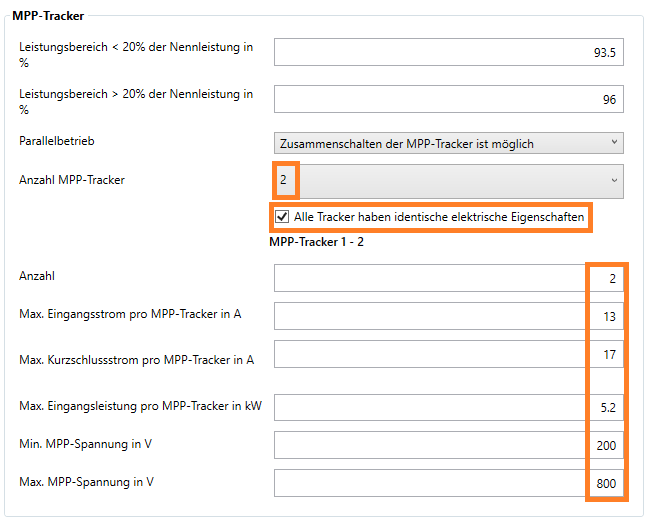
Guten Tag, vielen Dank für deine Nachricht. Wir geben dir recht, dass die Daten des Deye SUN-8K-SG04LP3-EU teilweise fehlerhaft eingetragen worden sind. Laut Datenblatt hat der Wechselrichter einen max. Kurzschlussstrom von 34 A nur zwei DC-Eingänge nur zwei MPP-Tracker (mit identischen elektrischen Eigenschaften) einen max. Eingangsstrom pro MPP-Tracker von 13 A einen max. Kurzschlussstrom pro MPP-Tracker von 17 A eine max. Eingangsleistung pro MPP-Tracker von 5,2 kW Wir werden den Hersteller kontaktieren und um Korrektur der Daten bitten. Du hast die Möglichkeit, den Wechselrichter-Datensatz zu kopieren. Im neu abgespeicherten Datensatz kannst du die Änderungen manuell vornehmen.